
Applying for IPOs (Initial Public Offerings) has become a popular route for investors aiming to diversify their portfolios. To streamline the approval of IPO mandate requests, the SBI Pay UPI App offers a secure and efficient platform for users. By understanding each step, you can easily approve your IPO mandate request and secure your investment.
In this guide, we’ll provide a step-by-step breakdown of the IPO mandate approval process on the SBI Pay UPI App. With a few simple steps, you’ll be ready to approve your mandate request and keep track of your IPO investments with confidence.
How to Approve IPO Mandate Request on SBI Pay UPI App
To ensure you’re ready to approve IPO mandates, check the following prerequisites:
- Register on the SBI Pay UPI App: If not already registered, download the app and follow the steps to complete your registration.
- Link Your Bank Account: Confirm that your bank account is linked with the SBI Pay UPI App for seamless transactions.
- Have a Valid UPI ID: A working UPI ID is essential to apply for the IPO and approve the mandate request.
Step 1: Submit IPO Application through Your Demat Account
Begin by applying for the IPO through your Demat account on platforms like Zerodha, Groww, or Angel One, using your SBI Pay UPI ID. Remember to apply during market hours (between 10 AM and 12 PM). Once you submit the mandate request, the IPO mandate will appear on your SBI Pay UPI App within about four hours.
Step 2: Open the SBI Pay UPI App
Launch the SBI Pay UPI App on your device to get started.
Step 3: Login with Your MPIN
To access your account securely, enter your MPIN to log in.
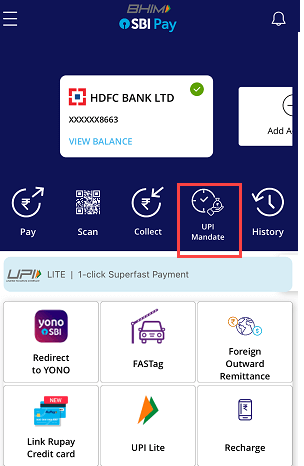
Step 4: Select the UPI Mandate Option
On the app’s home screen, locate and select the UPI Mandate option to view your active mandates.
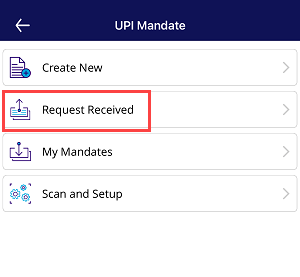
Step 5: Check Requests Received
Next, click on Request Received. Here, you’ll be able to view any pending mandate requests, including your IPO mandate request.
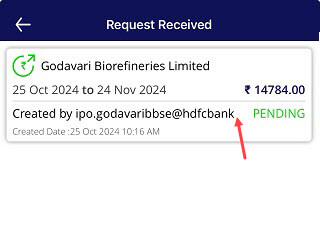
Step 6: Open the IPO Mandate Request
Identify the IPO mandate request, then click to open it and review the details.
Step 7: Approve the Mandate Request
To confirm, click the Approve button on the IPO mandate request.
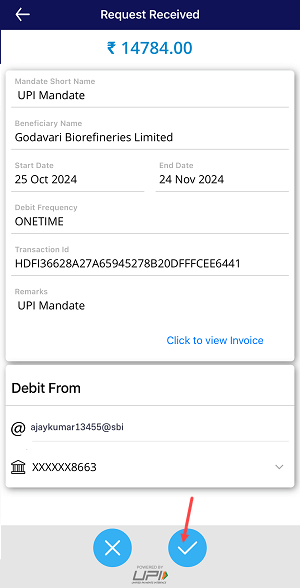
Step 8: Enter Your UPI PIN
Finally, enter your UPI PIN to authenticate and complete the approval process.
Confirmation and Fund Blocking
Upon completing these steps, your IPO mandate request will be successfully approved, and the IPO amount will be blocked in your linked bank account. If you receive an IPO allotment, the amount will be debited from your account automatically. In the case that no allotment is received, the blocked amount will be released back to you within 24 hours.
Conclusion
By following this guide, you can easily manage and approve your IPO mandates on the SBI Pay UPI App. You can add any bank account on SBI Pay App and create your UPI account.