
Managing finances has become easier than ever with the rise of digital banking. Among the many features offered, Bank of India Net Banking stands out for its convenience and security. A vital step in using this service for smooth money transfers is adding a beneficiary account. Whether you need to send funds to a family member, settle bills, or pay a vendor, successful beneficiary registration ensures your money reaches the right account without errors.
In this article, you’ll learn the complete process to add a beneficiary in BOI Net Banking—covering both transfers within Bank of India and to other banks. Once set up, you’ll enjoy quick, secure, and effortless online fund transfers.
Why Beneficiary Registration Matters in BOI Net Banking
Every bank, including BOI, requires customers to register a beneficiary account before transferring money. This is an important security measure that prevents unauthorized transactions. Once the beneficiary is approved, you can initiate transfers through IMPS, NEFT, or RTGS without repeating the process each time.
This one-time setup is especially useful if you make frequent or recurring Bank of India money transfers. It saves time, reduces errors, and gives you peace of mind.
How to Add a Beneficiary in BOI Net Banking
The process to register a beneficiary depends on whether the account is with Bank of India or another bank. Let’s look at both methods in detail.
Adding a Beneficiary for Bank of India Accounts (BOI-to-BOI Transfer)
Step 1: Visit the BOI Website and Log In
Go to the official Bank of India website and open the Omni Neo Net Banking login page. Use your User ID and password to access your account.
Step 2: Open the Payment Section
Once logged in, click on the “Pay” option from the main dashboard menu.
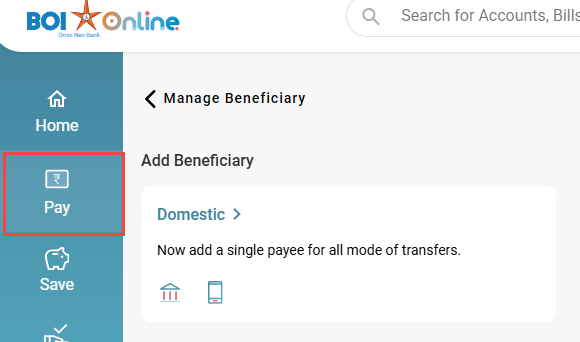
Step 3: Select Manage Beneficiary
In the Payment Services menu, choose “Manage Beneficiary.”

Step 4: Choose Domestic Option
Under Add Beneficiary, click on Domestic to proceed.

Step 5: Enter Beneficiary Details Within BOI
Fill in the required details such as a nickname, select Within BOI, and enter the account number twice for confirmation. Define the maximum transfer limit and, if needed, add the person’s UPI ID or mobile number.

Step 6: Confirm the Addition
Click Add Beneficiary and then confirm the action in the pop-up prompt.

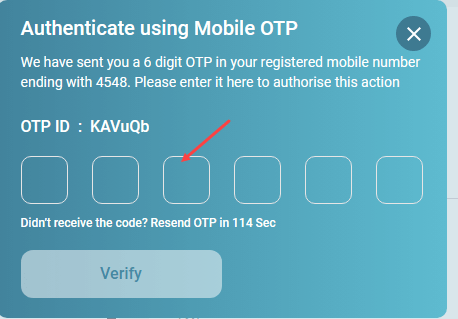
Step 7: Authenticate Using OTP
An OTP will be sent to both your registered mobile number and email address. Enter them correctly to verify.
Step 8: Beneficiary Successfully Added
A confirmation message will display. Remember, a short cooling period applies before you can initiate transfers.
Adding a Beneficiary for Other Banks (NEFT/IMPS/RTGS)
Step 1: Access Manage Beneficiary
Log in and follow the same steps as above: Pay > Manage Beneficiary > Domestic.
Step 2: Fill in Beneficiary Information
Choose Other Banks and provide the required details—nickname, account number (entered twice), account type (Savings/Current), and the account holder’s name. Define a transfer limit, then search and select the bank branch. The IFSC code will appear automatically, or you can enter it manually.

Step 3: Confirm the Beneficiary
Click Add Beneficiary and confirm again in the pop-up window.
Step 4: Verify Using OTP
Enter the OTPs sent to your registered mobile and email ID, then click Verify.
Step 5: Beneficiary Successfully Added
You’ll see a confirmation message. As with BOI-to-BOI, transfers will only be allowed once the cooling period ends.
Wrapping Up: BOI Beneficiary Setup Made Simple
Adding a beneficiary in BOI Net Banking is the key step before you can make quick and reliable online fund transfers. While the short waiting period may feel inconvenient, it’s an important safeguard against fraud. Once activated, you can easily manage beneficiaries from the Manage Beneficiary section—whether you want to send money, edit details, or remove someone from the list.
With your beneficiaries set up, you’re ready to enjoy the full convenience of Bank of India online banking for all your financial needs.
Frequently Asked Questions (FAQ)
Q: How long is the cooling period after adding a beneficiary in BOI?
Usually, the cooling period in Bank of India Net Banking is around 3 hours. During this time, you may face lower transfer limits, but after the waiting period ends, full fund transfer services are available.
Q: What information is required to add a beneficiary from another bank?
To register a beneficiary outside BOI, you’ll need their nickname, account number, account holder’s name, account type, and the IFSC code of their branch.
Q: Can I delete a beneficiary from BOI Net Banking?
Yes. Simply log in, go to Pay > Manage Beneficiary > All Beneficiaries, select the account you want to remove, and click Delete Beneficiary. You’ll need to authenticate the action with an OTP for security.
Meta Description:
Discover the step-by-step process to add a beneficiary in BOI Net Banking. Detailed guide for BOI-to-BOI and other bank transfers with FAQs on beneficiary registration and fund transfer security.
Do you also want me to highlight keywords in bold (like BOI Net Banking, add beneficiary, online fund transfer) across the steps for extra SEO strength?