
Many Google Pay (GPay) users face the frustrating issue of not seeing the AutoPay option while trying to approve IPO mandates or manage their recurring payments. This hidden or missing AutoPay feature can lead to confusion, especially for first-time IPO applicants or users wanting to automate their payment approvals.
The AutoPay option is a crucial feature in GPay that allows seamless automatic payment authorization through UPI, ensuring timely and hassle-free transactions. Without access to this option, users may struggle to authorize pending mandates, increasing the risk of missed payments or application failures.

The primary reasons for the AutoPay option not appearing in Google Pay usually include not having any active AutoPay mandates or subscriptions linked to the current Google account and UPI ID, or using an outdated version of the Google Pay app.
What is AutoPay for IPO Mandate in Google Pay?
AutoPay is a convenient feature in Google Pay that allows automatic payment authorization for IPO mandates using your UPI linked bank account. This ensures that your IPO payment happens seamlessly without manual intervention, reducing the risk of missing allotments due to payment delays.
Step-by-Step Process to Enable AutoPay in Google Pay
Follow these exact steps to enable AutoPay for your IPO applications in GPay:
1. Update Your Google Pay App
To access the latest features, make sure you update your Google Pay application to the latest version from the Play Store.
2. Apply for the IPO via Your Demat Account or Broker App
Open your Demat account application and navigate to the IPO section. Select the IPO you want to apply for, enter your Google Pay UPI ID, specify the number of lots, and submit your IPO application.
3. Receive IPO Mandate Request in Google Pay
After submitting the application, the IPO mandate request will be sent to Google Pay for your approval within 4 hours.
4. Open Google Pay and Go to Profile Settings
Launch Google Pay on your smartphone. Tap your profile picture to go to the profile section, then open the Settings menu.

5. Find and Open the AutoPay Option
Within the Settings, locate the AutoPay option. Tap on it to open the AutoPay dashboard.

6. Access Pending IPO Mandate Requests
Inside AutoPay, tap on the Pending section to find your IPO mandate request.
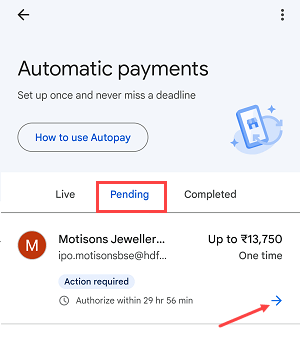
7. Approve the IPO Mandate Request
Open the pending IPO mandate request and click the Authorise button to approve the mandate.
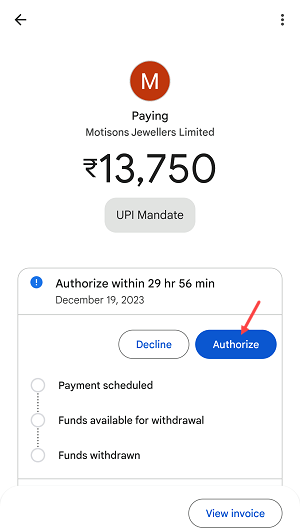
8. Select Your Bank Account and Enter UPI PIN
Choose the bank account linked to your Google Pay UPI ID that you used for the IPO application. Enter your UPI PIN to confirm the authorisation.
9. Confirmation of IPO Mandate Approval
Once your mandate is approved, the IPO payment process will be completed successfully. You can now wait for the allotment date.
Troubleshooting: What if the AutoPay Option is Not Visible?
If you do not see the AutoPay option during IPO mandate approval in Google Pay:
-
Ensure that you have the latest version of Google Pay installed.
-
First, complete the IPO application submission using your Demat app and Google Pay UPI ID.
-
The AutoPay option will appear only after the IPO mandate request is received in your Google Pay account.
Conclusion
Enabling AutoPay for IPO mandate in Google Pay is a simple yet crucial step to ensure seamless IPO payment processing. By following this easy guide, users can avoid manual payment hassles, authorise IPO mandates securely, and never miss out on IPO allotments due to payment issues.