
Axis Bank has recently introduced a new feature on their official UPI application, Axis Pay, that allows you to conveniently approve your IPO mandate. With this feature, you can simply use your Axis Pay UPI ID to create a UPI mandate for your IPO application and then easily approve the mandate through the Axis Pay app.
Anyone who has a bank account can use the Axis Pay UPI App to link their bank account and create a unique ID and PIN. It doesn’t matter if you have an account with Axis Bank or another bank, you can use the Axis Pay app to approve your IPO mandate on the go. Read also: How to check Axis Bank Debit Card number, CVV and expiry online
IPO UPI Mandate meaning?
When you approve an IPO UPI mandate, it means that you are authorizing automatic withdrawal of funds from your bank account. This is done by blocking the IPO amount in your account. Once you receive the IPO allotment, the amount will be automatically debited from your bank account without any further action required from your end. This helps to simplify the IPO application and allotment process.
On the other hand, if you did not receive an allotment in the IPO, the blocked amount will be unblocked within 10 working days.
You can apply for an IPO through your Demat account application and create a UPI mandate using the UPI ID linked to your bank account. Read also: How to check Axis Bank account balance by missed call
Now let’s see how to approve the IPO UPI Mandate through the Axis Pay app.
Steps to Approve IPO Mandate on Axis Pay App
I assume that you have already set up your UPI account on the Axis Pay application and created your UPI ID and UPI PIN. If you haven’t done so yet, please download the application from the Play Store or Apple Store and link your bank account to Axis Pay.
Now let’s see how to accept the IPO Mandate on the Axis Pay App:-
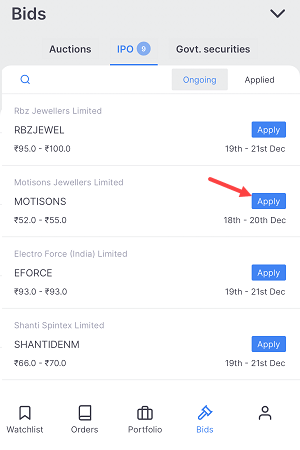
(Step 1) First, we will apply for IPO from the Demat account application. Open your Demat account application whatever you are using and go to the “IPO” section where you can apply for an IPO application. Select your IPO and tap on the “Apply” button.
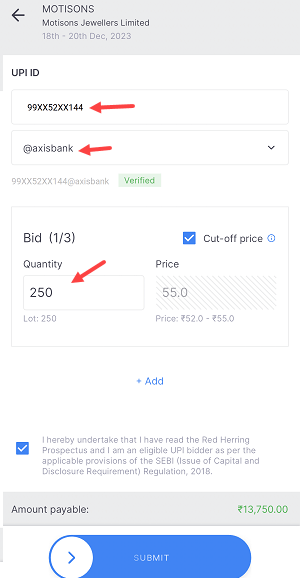
(Step 2) On the apply IPO screen, you need to enter your Axis Pay UPI ID, enter lot numbers (per lot you need to pay 14,000 something), and submit your application.
(Step 3) Ok So you have successfully applied for IPO and your UPI mandate has been created successfully. Now we need to approve the IPO mandate on the Axis Pay app.

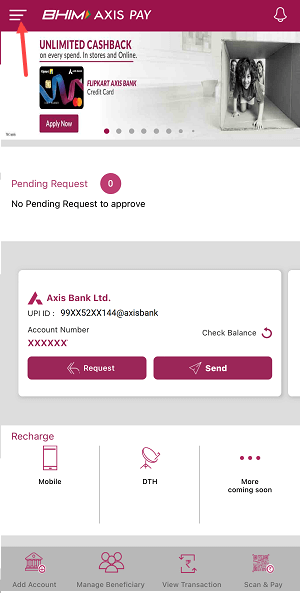
(Step 4) Please be patient and wait for at least 4-5 minutes or longer to receive the UPI mandate request on your Axis Pay application. Sometimes the request may take time to arrive. To check for the request, open your Axis Pay application and tap on the three horizontal lines on the top left side to access the Menu option.
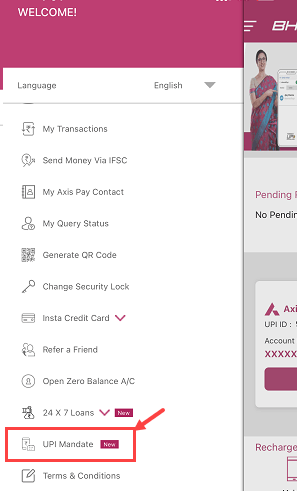
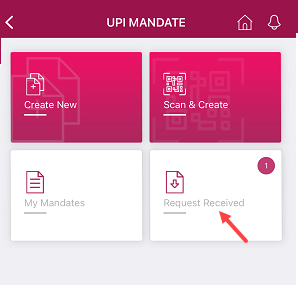
(Step 5) In the menu options, you need to open the “UPI Mandate” option.
(Step 6) Next screen tap and open the “Request Received” section as seen in the below image.
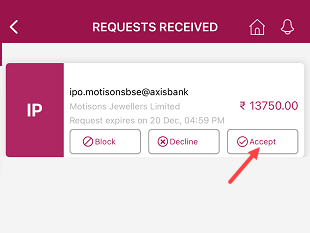
(Step 7) Next screen you can check your IPO mandate request. Tap on the “Request” to approve this mandate request.
After Approving the IPO Mandate on Axis Pay
When you approve the IPO UPI Mandate, the amount you entered in the IPO application will be blocked in your bank account.
After the allotment of an IPO, the amount will be automatically debited from the bank account that is linked to the UPI ID used to approve the mandate. This process usually takes a few days.
However, if you are unlucky and do not receive the IPO allotment, there is no need to worry. The blocked amount will be automatically unblocked within 10 days.
Points to remember when approving an IPO Mandate on Axis Pay
- To apply for an IPO and create a mandate, please note that you can only do so during market hours, which are from 9:30 AM to 3:30 PM.
- It’s important to keep in mind that you won’t receive an IPO mandate request on Axis Pay when the market is closed.
- If you receive an IPO mandate request on Axis Pay, please approve it before 5 PM on the same day to avoid the mandate expired.
- Please wait for 4-5 minutes to receive a mandate request on Axis Pay.