
Keeping your email ID updated with your State Bank of India (SBI) account is crucial for receiving important alerts, statements, and transaction notifications. This comprehensive guide will walk you through the simple, step-by-step process of registering or updating your email ID online via SBI Net Banking.
Why Update Your Email ID with SBI?
Updating your registered email ID with SBI offers numerous benefits:
- Timely Notifications: Receive immediate alerts for all your transactions, including debits and credits, ensuring you’re always aware of your account activity.
- e-Statements: Get your bank statements directly in your inbox, reducing paper waste and providing easy access to your financial records.
- Enhanced Security: Benefit from increased security through email-based OTP for certain online transactions, adding an extra layer of protection.
Let’s dive into the process!
Step-by-Step Guide to Register/Update Email ID in SBI Net Banking
Follow these detailed steps to successfully update your email address with your SBI account:
Step 1: Login To SBI Net Banking Account
Log in to your SBI Net Banking account. Visit the official net banking login page and enter your Usename and login password to login.

Step 2: Navigate to “My Accounts & Profile”
Once you’re on the dashboard, locate and click on the “My Accounts & Profile” section. This is your primary gateway for managing various aspects of your SBI banking profile.

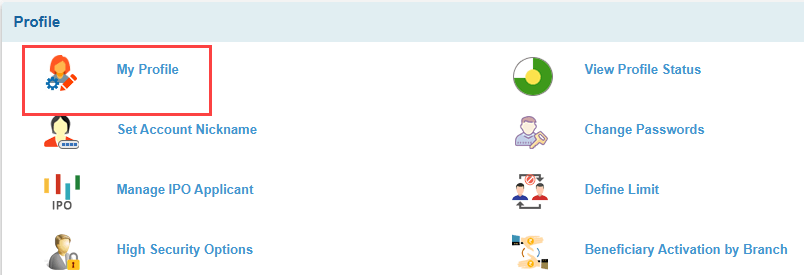
Step 3: Access Your “Profile” Section
Within the “My Accounts” section, you’ll find several options related to your account summary and statements. To proceed with updating your personal details, click on the “Profile” icon.

Step 4: Select “My Profile” for Personal Information Management
On the “Profile” page, you’ll see various sub-options for managing your account. Click on “My Profile” to access and modify your personal information, including your email ID.
Step 5: Enter Your Profile Password for Security Verification
For security purposes and to ensure only authorized changes are made, you will be prompted to enter your Profile Password. This is a specific password used for modifying your personal details, distinct from your regular login password. Enter your Profile Password accurately and then click “Submit.”

Step 6: Locate “Email ID” Field and Click “Update”
You will now see a detailed view of your personal information. Scroll down until you find the “Email ID” field. To either register a new email or update your existing one, click on the prominent “Update” button positioned next to it.

Step 7: Enter Your New Email ID and Submit
A new window titled “Update Email Details” will appear. Carefully enter the new email ID you wish to register or update into the designated input field. Double-check for any typos to ensure accuracy, then click “Submit.”

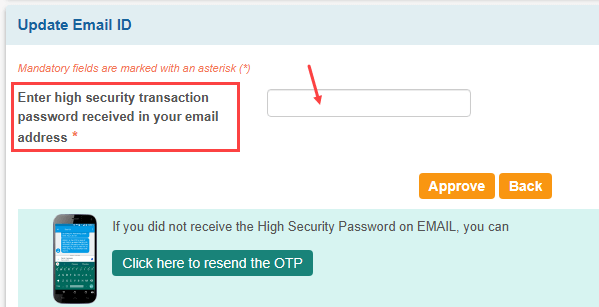
Step 8: Verify Email ID through OTP
You will receive an OTP at the email ID you entered. Check your inbox, enter the OTP, and click the Approve button. If you are still waiting for the OTP, click the Resend button.
Step 9: Choose “OTP through SMS” for Approval Type
You will be presented with options to approve the email ID update. Select the “OTP through SMS” option. This is the most widely used and convenient method, where a One Time Password (OTP) will be dispatched to your registered mobile number. After making your selection, click “Submit.”

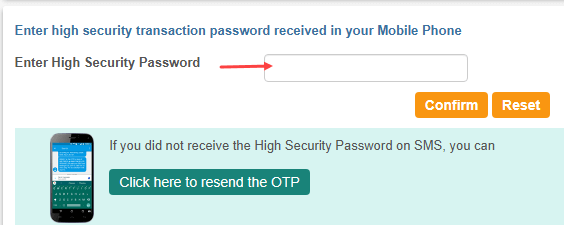
Step 10: Enter High Security Transaction Password from SMS
Check your registered mobile phone immediately for an SMS containing a “High Security Transaction Password.” This OTP is essential for verifying your request. Enter this password precisely into the provided field on the “Update Email ID” page. Once entered, click “Confirm” to finalize the verification.
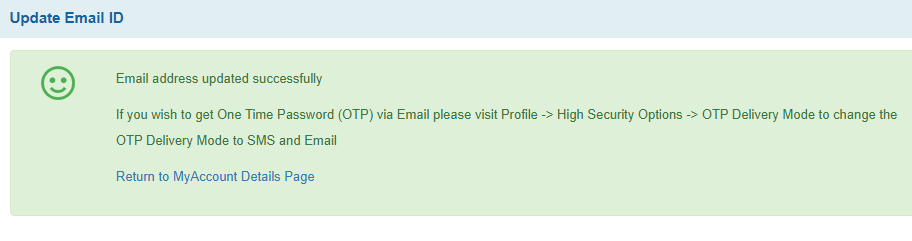
Step 11: Confirmation of Successful Email Address Update
Upon successful verification of the OTP, you will see a green confirmation message indicating, “Email address updated successfully.” This confirms that your new email ID has been securely registered with your SBI account. The message also provides useful information on how to change your OTP delivery mode to email if you wish. You can then click “Return to MyAccount Details Page” to go back to your main account dashboard.
Congratulations! You have successfully registered or updated your email ID with your SBI account online. You will now begin receiving all important communications, including transaction alerts and e-statements, to your newly updated email address, enhancing your online banking experience.